Índice:
Continúe leyendo o si prefiere haga CLIC AQUÍ para ir a un enlace a YouTube donde podrá ver un tutorial paso a paso. Para crear un índice para tus páginas en WordPress utilizando HTML, puedes seguir estos pasos:
Accede al Editor de Páginas de WordPress: Inicia sesión en tu panel de administración de WordPress y navega hasta la página en la que deseas agregar el índice. Luego, selecciona la opción «Editar» para abrir el editor de esa página.
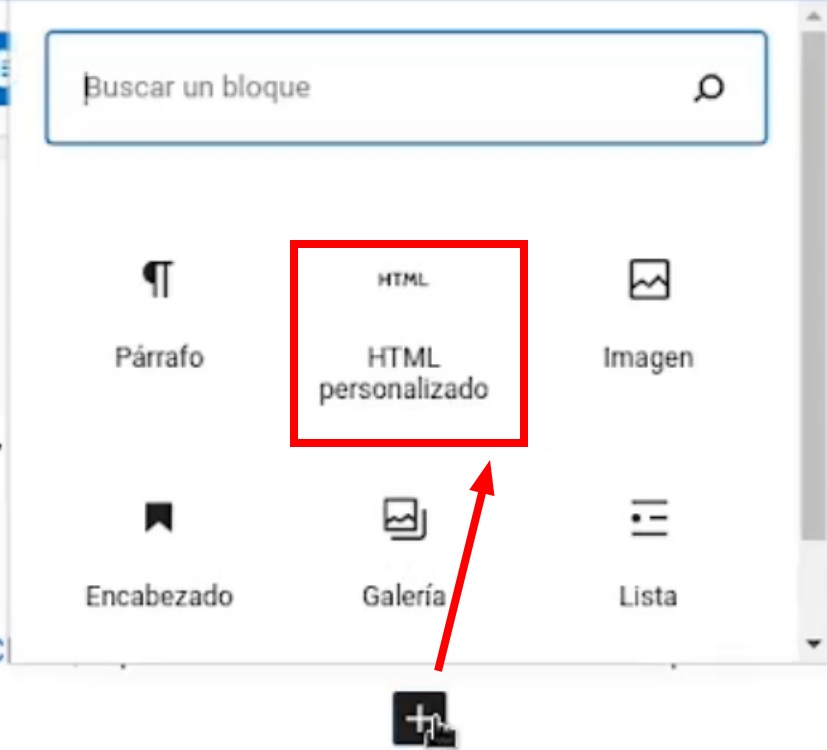
Habilita el Editor de HTML: Una vez que estés en el editor de páginas, haz clic izquierdo en el botón «Añadir bloque», busca «HTML personalizado» y selecciónalo. Esto te permitirá trabajar con el código HTML directamente.
Inserta el Código del Índice: Ahora, puedes agregar el código HTML necesario para crear el índice. A continuación, te mostraré un ejemplo básico de un índice:
Ejemplo 1: Índice sencillo
Código
<div class="indice1">
  <h2>Índice:</h2>
  <ul>
    <li><a href="#seccion1">Sección 1: Introducción</a></li>
    <li><a href="#seccion2">Sección 2: Desarrollo</a></li>
    <li><a href="#seccion3">Sección 3: Conclusión</a></li>
  </ul>
</div>
En este ejemplo, hemos creado un div con la clase «indice» que contiene una lista desordenada (ul) con enlaces (li) a las secciones de la página.
Vista
Cada enlace utiliza el atributo href para enlazar a una sección específica dentro de la página, identificada por el atributo id. #seccion1 con seccion1 y así sucesivamente.
Ejemplo 2: Contenido prueba para los índices
Código
<!-- Aquí empieza tu contenido -->
<h2 id="seccion1">Sección 1: Introducción</h2>
<p>Contenido de la sección 1...</p>

<h2 id="seccion2">Sección 2: Desarrollo</h2>
<p>Contenido de la sección 2...</p>

<h2 id="seccion3">Sección 3: Conclusión</h2>
<p>Contenido de la sección 3...</p>
Vista (Le puse texto de ejemplo en Contenido de la sección 1, 2 y 3)
Sección 1: Introducción
Contenido de la sección 1. Lorem Ipsum is simply dummy text of the printing and typesetting industry. Lorem Ipsum has been the industry’s standard dummy text ever since the 1500s, when an unknown printer took a galley of type and scrambled it to make a type specimen book. It has survived not only five centuries, but also the leap into electronic typesetting, remaining essentially unchanged. It was popularised in the 1960s with the release of Letraset sheets containing Lorem Ipsum passages, and more recently with desktop publishing software like Aldus PageMaker including versions of Lorem Ipsum. Lorem Ipsum is simply dummy text of the printing and typesetting industry. Lorem Ipsum has been the industry’s standard dummy text ever since the 1500s, when an unknown printer took a galley of type and scrambled it to make a type specimen book. It has survived not only five centuries, but also the leap into electronic typesetting, remaining essentially unchanged. It was popularised in the 1960s with the release of Letraset sheets containing Lorem Ipsum passages, and more recently with desktop publishing software like Aldus PageMaker including versions of Lorem Ipsum.
Sección 2: Desarrollo
Contenido de la sección 2. It is a long established fact that a reader will be distracted by the readable content of a page when looking at its layout. The point of using Lorem Ipsum is that it has a more-or-less normal distribution of letters, as opposed to using ‘Content here, content here’, making it look like readable English. Many desktop publishing packages and web page editors now use Lorem Ipsum as their default model text, and a search for ‘lorem ipsum’ will uncover many web sites still in their infancy. Various versions have evolved over the years, sometimes by accident, sometimes on purpose (injected humour and the like). It is a long established fact that a reader will be distracted by the readable content of a page when looking at its layout. The point of using Lorem Ipsum is that it has a more-or-less normal distribution of letters, as opposed to using ‘Content here, content here’, making it look like readable English. Many desktop publishing packages and web page editors now use Lorem Ipsum as their default model text, and a search for ‘lorem ipsum’ will uncover many web sites still in their infancy. Various versions have evolved over the years, sometimes by accident, sometimes on purpose (injected humour and the like).
Sección 3: Conclusión
Contenido de la sección 3. Contrary to popular belief, Lorem Ipsum is not simply random text. It has roots in a piece of classical Latin literature from 45 BC, making it over 2000 years old. Richard McClintock, a Latin professor at Hampden-Sydney College in Virginia, looked up one of the more obscure Latin words, consectetur, from a Lorem Ipsum passage, and going through the cites of the word in classical literature, discovered the undoubtable source. Lorem Ipsum comes from sections 1.10.32 and 1.10.33 of «de Finibus Bonorum et Malorum» (The Extremes of Good and Evil) by Cicero, written in 45 BC. This book is a treatise on the theory of ethics, very popular during the Renaissance. The first line of Lorem Ipsum, «Lorem ipsum dolor sit amet..», comes from a line in section 1.10.32. The standard chunk of Lorem Ipsum used since the 1500s is reproduced below for those interested. Sections 1.10.32 and 1.10.33 from «de Finibus Bonorum et Malorum» by Cicero are also reproduced in their exact original form, accompanied by English versions from the 1914 translation by H. Rackham. Contrary to popular belief, Lorem Ipsum is not simply random text. It has roots in a piece of classical Latin literature from 45 BC, making it over 2000 years old. Richard McClintock, a Latin professor at Hampden-Sydney College in Virginia, looked up one of the more obscure Latin words, consectetur, from a Lorem Ipsum passage, and going through the cites of the word in classical literature, discovered the undoubtable source. Lorem Ipsum comes from sections 1.10.32 and 1.10.33 of «de Finibus Bonorum et Malorum» (The Extremes of Good and Evil) by Cicero, written in 45 BC. This book is a treatise on the theory of ethics, very popular during the Renaissance. The first line of Lorem Ipsum, «Lorem ipsum dolor sit amet..», comes from a line in section 1.10.32. The standard chunk of Lorem Ipsum used since the 1500s is reproduced below for those interested. Sections 1.10.32 and 1.10.33 from «de Finibus Bonorum et Malorum» by Cicero are also reproduced in their exact original form, accompanied by English versions from the 1914 translation by H. Rackham.
Personaliza el Índice: Puedes personalizar el código del índice según tus necesidades. Por ejemplo, puedes cambiar el texto y los enlaces para que coincidan con las secciones de tu página.
Aquí te dejo ejemplos de índices más estilizados utilizando HTML y CSS para que puedas personalizarlo según tus preferencias:
Ejemplo 3: Índice con CSS
Código
<style>
  /* Estilos para el índice */
  .indice2 {
    background-color: #f5f5f5;
    border: 1px solid #ddd;
    padding: 15px;
    border-radius: 5px;
    box-shadow: 0px 0px 5px rgba(0, 0, 0, 0.2);
  }

  .indice2 h2 {
    font-size: 1.2em;
    margin-top: 0;
    color: #333;
  }

  .indice2 ul {
    list-style: none;
    padding: 0;
  }

  .indice2 li {
    margin: 5px 0;
  }

  .indice2 a {
    text-decoration: none;
    color: #0073e6;
    font-weight: bold;
    transition: color 0.3s;
  }

  .indice2 a:hover {
    color: #0052a5;
  }
</style>

<div class="indice2">
  <h2>Índice:</h2>
  <ul>
    <li><a href="#seccion1">Sección 1: Introducción</a></li>
    <li><a href="#seccion2">Sección 2: Desarrollo</a></li>
    <li><a href="#seccion3">Sección 3: Conclusión</a></li>
  </ul>
</div>
Vista
En este ejemplo, he añadido estilos CSS para darle un aspecto más atractivo al índice. Puedes personalizar los colores, las fuentes y otros estilos según tus preferencias. Además, he incluido un efecto de cambio de color en los enlaces cuando pasas el cursor sobre ellos para hacerlo más interactivo.
Ejemplo 4: Índice con CSS
Código
<style>
  /* Estilos para el índice */
  .indice3 {
    background-color: #333;
    color: #fff;
    border-radius: 8px;
    padding: 20px;
    box-shadow: 0 0 10px rgba(0, 0, 0, 0.3);
  }

  .indice3 h2 {
    font-size: 1.8em;
    color: #ff5733;
    text-transform: uppercase;
    margin-bottom: 10px;
  }

  .indice3 ul {
    list-style-type: none;
    padding: 0;
  }

  .indice3 li {
    margin: 10px 0;
    transition: transform 0.2s;
  }

  .indice3 a {
    text-decoration: none;
    color: #ff5733;
    font-weight: bold;
    transition: color 0.3s;
  }

  .indice3 a:hover {
    color: #ffa07a;
  }

  /* Efecto de resaltado al pasar el ratón sobre los elementos de la lista */
  .indice3 li:hover {
    transform: scale(1.05);
  }
</style>

<div class="indice3">
  <h2>Contenido:</h2>
  <ul>
    <li><a href="#seccion1">Sección 1: Introducción</a></li>
    <li><a href="#seccion2">Sección 2: Desarrollo</a></li>
    <li><a href="#seccion3">Sección 3: Conclusión</a></li>
  </ul>
</div>
Vista
En este ejemplo, he utilizado colores llamativos, tipografía en mayúsculas y un diseño moderno con una sombra sutil para resaltar el índice. Además, se ha agregado un efecto de escala suave al pasar el ratón sobre los elementos de la lista para mejorar la interacción.
Guarda los Cambios: Una vez que hayas insertado el índice y personalizado según tus preferencias, asegúrate de guardar los cambios en tu página.
Previsualiza y Publica: Antes de publicar los cambios en tu página, es recomendable previsualizar la página para asegurarte de que el índice funcione correctamente. Luego, puedes hacer clic en el botón «Publicar» para que los cambios sean visibles en tu sitio web.